


I sometimes check my gaming PC’s power supply to make sure it is delivering the correct voltage to all components. PSU testing is a useful way to check its condition and identify potential electrical issues.
There are different methods that you can try out to test a PSU. However, some of them are more effective than others because they provide more accurate readings and help identify different types of power supply issues. In this article, I will cover 3 of these methods that you can use to check whether your power supply is working properly. So, let’s get straight into it.
What Does PSU Testing Mean on a Gaming PC?
PSU testing involves checking whether your power supply is working properly and delivering the correct voltage to your PC components. It helps you identify potential problems before they affect other hardware.
A faulty PSU may struggle to provide consistent power, especially when your graphics card and processor are under heavy load. Testing it can help you determine whether the power supply is responsible for your PC’s instability or other issues.
Some gamers might want to check what type of PSU they have so that they can find out its wattage, model, and specifications before testing it or considering a replacement.
If you want help with this, you can read my guide on “How to Check What Power Supply You Have on Your PC”. It will show you different ways to identify your PSU and check its specifications.
3 Effective Methods to Test Power Supply on a Gaming PC
There are different ways to check whether your PSU is working properly. Some methods require basic tools, while others involve checking its electrical output directly. Here are three methods you can try.
1. Use a PSU Tester
A PSU tester is one of the easiest tools to check your power supply. It connects to your PSU’s cables and displays their voltage readings. You can use these readings to identify potential power supply problems.
Follow these steps:
- Turn off your gaming PC and switch off the PSU.
- Disconnect the power cable from the wall outlet.
- Disconnect the PSU cables from your motherboard, graphics card, and other components.
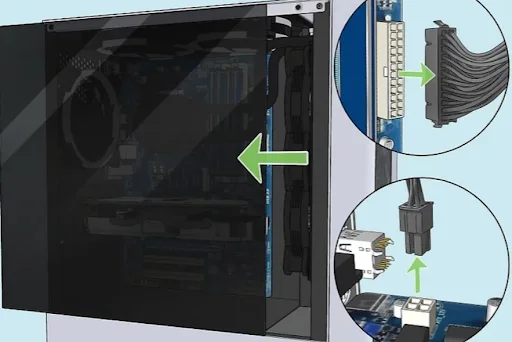
- Connect the 24-pin motherboard power connector to the PSU tester.
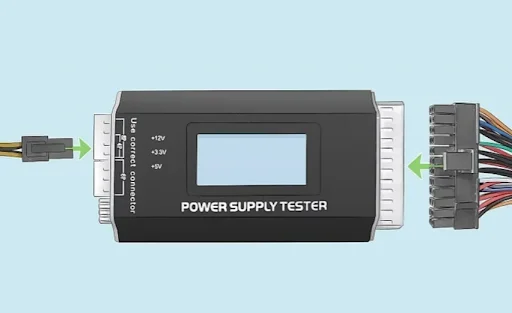
- Connect the other required PSU connectors if your tester supports them.
- Reconnect the PSU to the power outlet and switch it on.
- Check the voltage readings displayed on the tester.
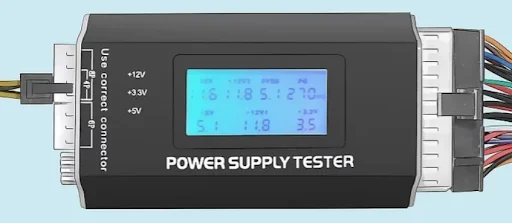
Compare the displayed readings with the standard voltage ranges. For example, the 12V rail should generally stay between 11.4V and 12.6V. The 5V rail should stay between 4.75V and 5.25V, while the 3.3V rail should remain between 3.135V and 3.465V.
If the readings fall outside these ranges, your PSU may have a problem. However, a basic PSU tester cannot always identify issues that only appear when the power supply is under load.
2. Use a Digital Multimeter
A digital multimeter can also help you test your PSU. Unlike a basic PSU tester, it allows you to measure individual voltage outputs directly. This method is useful if you already have a multimeter and know how to use it.
Here is how to check your PSU with one:
- Turn off your PC and disconnect the PSU from the wall outlet.
- Disconnect the 24-pin ATX connector from the motherboard.
- Set your digital multimeter to DC voltage mode.
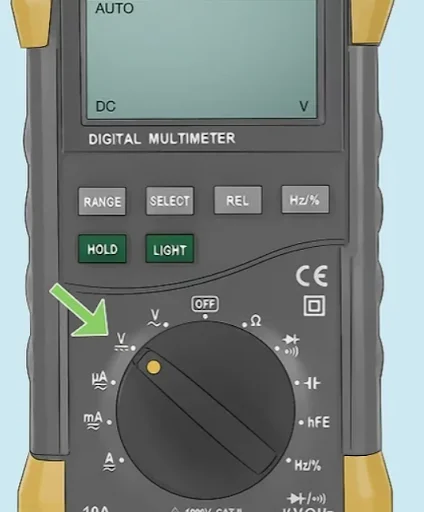
- Identify the voltage and ground pins on the 24-pin connector using a reliable ATX pinout diagram.
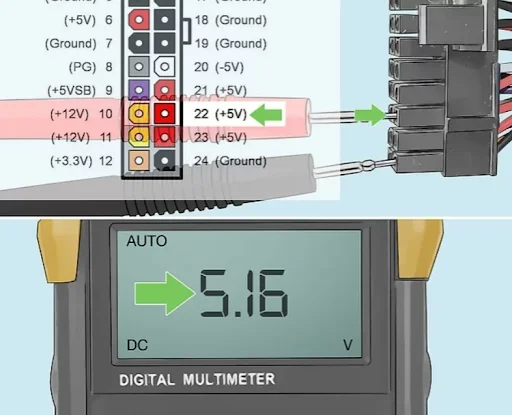
- Reconnect the PSU to power and turn it on using a proper PSU test switch or a suitable test setup.
- Carefully place the black probe on a ground pin and the red probe on the voltage pin you want to check.
- Check the readings on the multimeter.
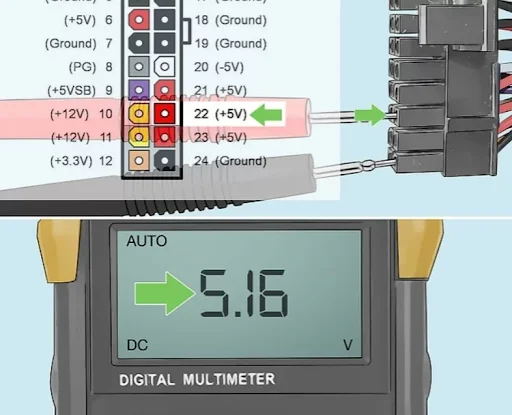
Compare the results with the standard voltage ranges mentioned in the previous method. If the readings are unusually low or high, your PSU may not be supplying the correct voltage.
Be careful when using a multimeter on a powered connector. Avoid touching adjacent pins with the probes, as this can cause a short circuit. If you are unfamiliar with electrical testing, use a dedicated PSU tester or ask a technician for help.
3. Perform the Paperclip Test
The paperclip test is another way to check whether your PSU can turn on. It involves connecting two specific pins on the 24-pin motherboard connector. You don’t need a dedicated PSU tester, but you should be careful when performing this test.
Follow these steps:
- Turn off your PC and unplug the PSU from the wall outlet.
- Disconnect all PSU cables from your PC components.
- Locate the green PS_ON wire and a black ground wire on the 24-pin motherboard connector.
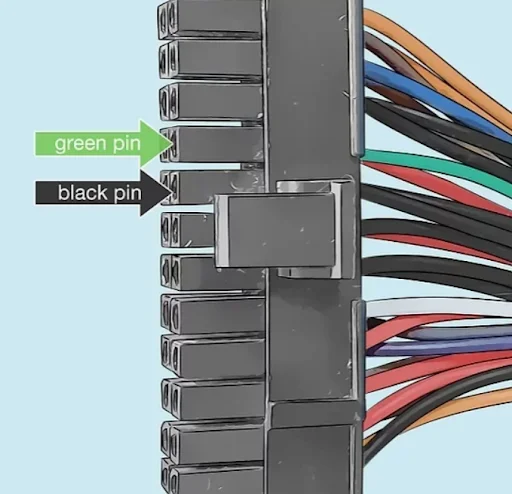
- Straighten a paperclip and carefully insert its ends into the corresponding pins to bridge them. Use an insulated jumper instead if available.
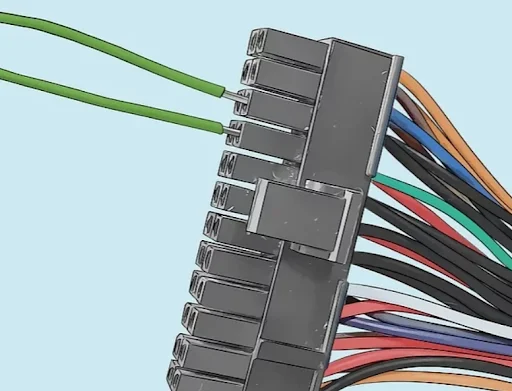
- Make sure the connection is secure and that no exposed metal can be touched.
- Connect the PSU to the power outlet and switch it on.
- Check whether the PSU starts running.
If the PSU starts, it means it can turn on. However, this does not confirm that it is working properly or supplying stable voltage to your gaming PC. Some modern PSUs also have a zero-RPM fan mode, so their fans may not spin at low loads.
Important: Never perform this test while the PSU is connected to your PC components. Do not touch the jumper or exposed connections while the PSU is powered on. Never open the PSU casing, as its internal capacitors can retain dangerous electrical charges.
Useful Tips for Testing the PSU
Here are a few additional things to keep in mind when testing your gaming PC’s power supply:
- Check the PSU Cables: Look for damaged connectors, loose connections, or exposed wires. Replace damaged cables before using the PSU again.
- Check the PSU Wattage: Make sure your power supply has enough wattage for your processor and graphics card. An underpowered PSU may struggle when gaming.
- Watch for Unusual Signs: Burning smells, unusual buzzing, or excessive heat can indicate a PSU problem. Turn it off and disconnect it if you notice these signs.
- Test Under Load: A PSU may work normally when idle but struggle during demanding games. A basic PSU tester or paperclip test cannot identify every load-related issue.
- Don’t Ignore Repeated Shutdowns: If your PC keeps restarting or shutting down during gaming, investigate the PSU along with other possible hardware and temperature-related issues.
Final Words
Testing your gaming PC’s power supply can help you identify potential electrical problems and avoid unnecessary hardware replacements. You can use a dedicated PSU tester, a digital multimeter, or the paperclip test to check different aspects of its operation.
However, remember that not all methods provide the same level of information. If you suspect a serious PSU problem, consider getting it tested by a professional or replacing it with a suitable unit.
People Also Ask
Random shutdowns, unexpected restarts, and power-related crashes can indicate a faulty PSU. However, these problems can also come from other hardware components.
Yes, you can check its voltage outputs with a multimeter using a suitable test setup. However, a dedicated PSU tester is generally easier to use.
No, a spinning fan only indicates that the PSU can turn on. It does not confirm that the unit is delivering stable power.
You don’t need to test your PSU regularly if your PC is working normally. Check it when you experience repeated shutdowns, restarts, or other possible power-related problems.
