
Nothing kills a gaming session faster than stutters, input lag, and a PC that should be faster than it feels. You’ve got decent hardware — maybe even a solid GPU and a fresh Windows install — and yet something still feels off. Frames drop at the worst moments. The game feels sluggish. Your 144Hz monitor looks suspiciously like 60Hz, and you only have one question in your mind: how to optimize my PC for gaming.
The frustrating reality is that Windows is not configured for gaming out of the box. It’s optimized for battery life, background productivity tasks, and compatibility—not the sustained, low-latency performance gaming demands. That’s true whether you just built a machine or you’ve owned it for a year.
This guide covers everything: why your PC might be running slow for games, how to fix it step-by-step, and how to tune your setup specifically for competitive FPS, 144Hz, or ray tracing—depending on what you actually care about and, most importantly the settings that I would apply on my own gaming pc.
Quick Answer:
To optimize a PC for gaming, update your GPU drivers, enable XMP/EXPO in BIOS for full RAM speed, switch your Windows power plan to “High Performance,” disable background apps, and turn on Game Mode. In your GPU control panel, set “Power Management” to Maximum Performance and disable VSync globally (control it in-game instead). These changes alone can recover 1-10% more consistent frame performance on most systems.
For deeper gains — especially on Windows 11 — read the full sections below.
Why Is My PC Running Slow? (Diagnose Before You Fix)
Before you start tweaking settings, spend two minutes figuring out where the bottleneck is. Optimizing the wrong thing wastes time.
CPU Bottleneck:
- Task Manager shows CPU usage at 90–100% during games
- Frame rate doesn’t improve when you lower graphics settings
- You’re on an older quad-core (pre-2019 era) paired with a modern GPU
GPU Bottleneck
- GPU usage sits at 95–99% in demanding scenes
- Lowering resolution or shadow quality immediately raises FPS
- This is actually healthy—it means your GPU is being fully used
Signs your RAM is the problem:
- You have 8GB or less RAM (some modern games need 16GB baseline)
- RAM is running at its base JEDEC speed, not its advertised speed—check CPU-Z; a 3200 MHz kit often runs at 2133 MHz until you enable XMP
Signs your storage is causing stutter:
- Long loading times, textures “popping in” mid-game, or hitching every few seconds in open-world games
- You’re running games from an HDD, not an SSD
Once you’ve identified the bottleneck, go to the relevant section below. If you’re not sure, follow the guide top to bottom—most of these fixes take under 5-10 minutes each.
How to Optimize Your Gaming PC for Gaming Performance: Easy Steps
Optimizing your gaming PC requires more than just upgrading hardware. By adjusting drivers, Windows settings, BIOS options, and storage configuration, you can improve FPS, reduce stutters, and achieve smoother gameplay.
1. Update GPU drivers.
Outdated drivers are one of the most common causes of poor gaming performance and are frequently overlooked. But there’s a right way to update them.
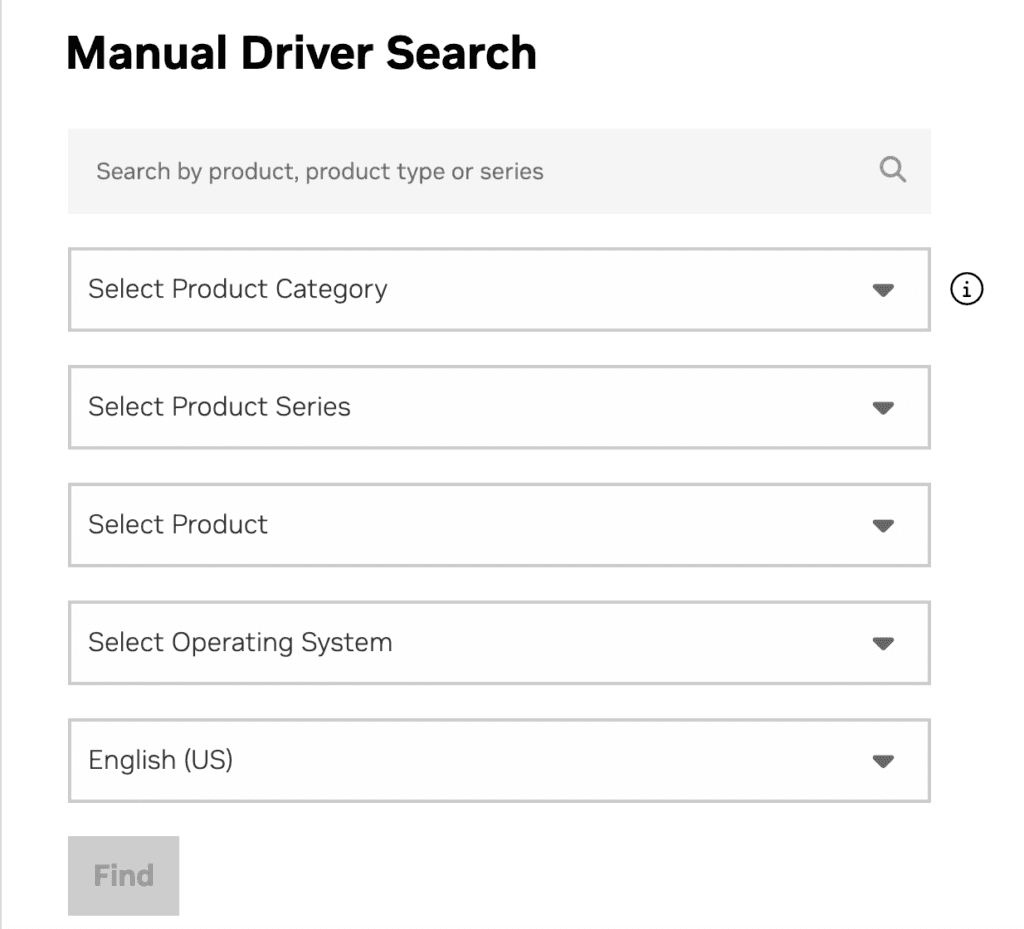
For NVIDIA users:
- Download the latest Game Ready or Studio Driver from nvidia.com/drivers
- During installation, choose Custom → check “Perform a clean installation”
- This removes old driver remnants that can cause conflicts
For AMD users:
- Download AMD Adrenalin from amd.com/support
- Use the “Factory Reset” option when installing to clear old profile data
In 2025–2026, both NVIDIA and AMD have pushed significant driver-level optimizations—NVIDIA’s Frame Generation (DLSS 4 with Multi-Frame Generation) and AMD’s FSR 4 both require current drivers to function. Running a driver from 2023 means you’re leaving real performance on the table.
2. Optimize Windows 11 for Gaming
Windows 11’s gaming features are better than Windows 10’s in some ways, but the default configuration is still not tuned for performance. Here’s what to actually change.
1. Enable Game Mode
- Open Settings → Gaming → Game Mode.
- Toggle Game Mode On.
- It prioritizes game performance by reducing background activity.
- Helps minimize stutters caused by Windows Update and other background processes.
2. Set Your Power Plan to High Performance
- Open Control Panel → Power Options.
- Select the High Performance power plan (click Show additional plans if needed).
- Prevents the CPU from lowering clock speeds to save power.
- Helps maintain higher, more consistent FPS, especially on desktop PCs.
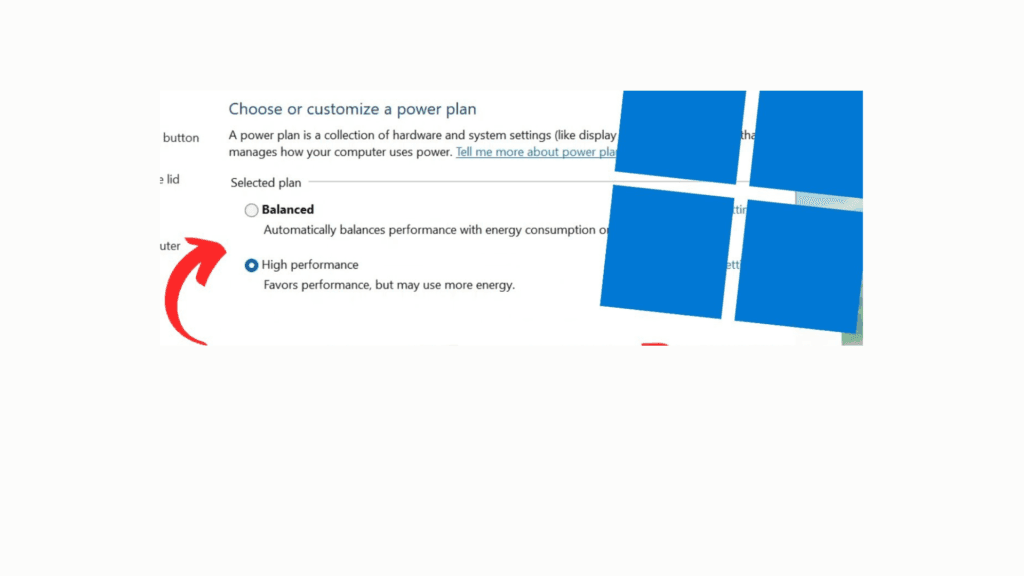
You can also enable the hidden Ultimate Performance plan. Open PowerShell as admin and run:
powercfg -duplicatescheme e9a42b02-d5df-448d-aa00-03f14749eb61
Then select it in Power Options. It disables processor idle states (C-states) more aggressively than High Performance, removing the micro-latency from the CPU waking up between tasks.
Important caveat: On Intel 12th/13th/14th gen and AMD Ryzen 7000+ (both use hybrid or mixed-core architectures), Ultimate Performance can sometimes hurt more than it helps—it prevents the OS scheduler from correctly parking efficiency cores, which can increase background noise on your P-cores.
If you’re on one of these platforms, test your 1% lows with it on vs. off. For pre-12th gen Intel and pre-Ryzen 7000 AMD, it’s a straightforward win.
3. Disable Xbox Game Bar (If You Don’t Use It)
- Open Settings → Gaming → Xbox Game Bar.
- Turn Xbox Game Bar Off if you don’t use it.
- Frees background resources and may reduce micro-stutters.
- Keep it enabled if you regularly use it for game captures or recordings.
4. Turn Off Hardware-Accelerated GPU Scheduling (HAGS)—Or Turn It On
It can reduce latency and improve gaming performance on supported hardware. Leave it Off on GPUs released before 2020, as it may cause stuttering.
- Open Settings → Display → Graphics → Default Graphics Settings.
- Enable Hardware-Accelerated GPU Scheduling (HAGS) if you have an NVIDIA RTX 30-series or newer or AMD RX 6000-series or newer GPU.
For a more detailed breakdown of every relevant Windows 11 toggle, see our guide on optimizing Windows 11 for gaming.
5. Enable XMP/EXPO in Your BIOS (Most People Skip This)
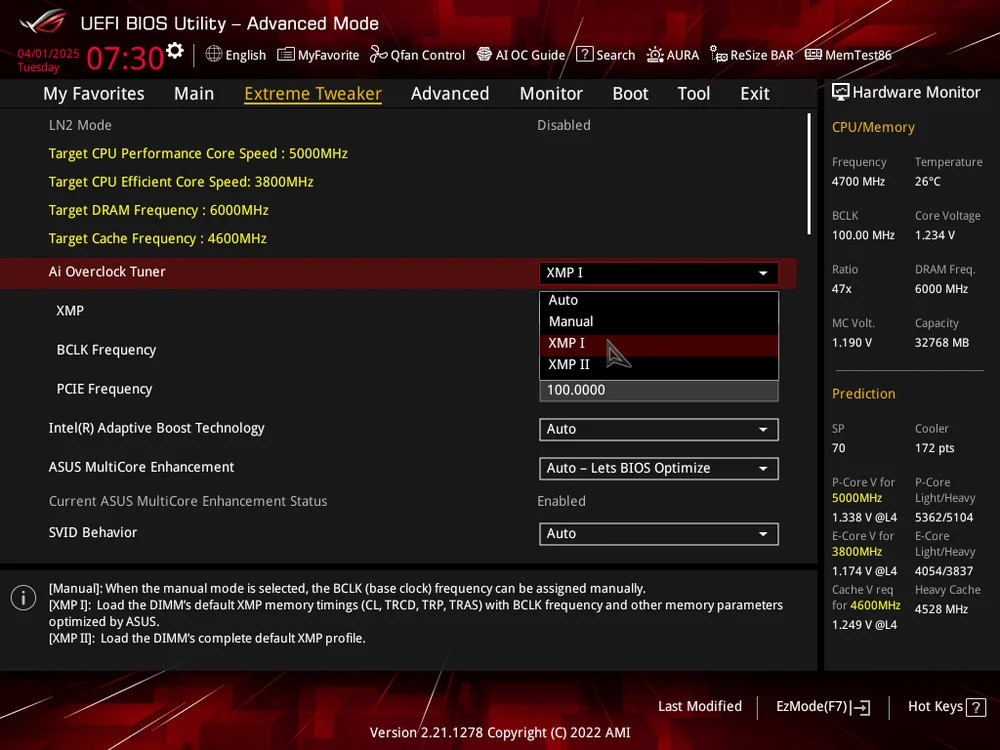
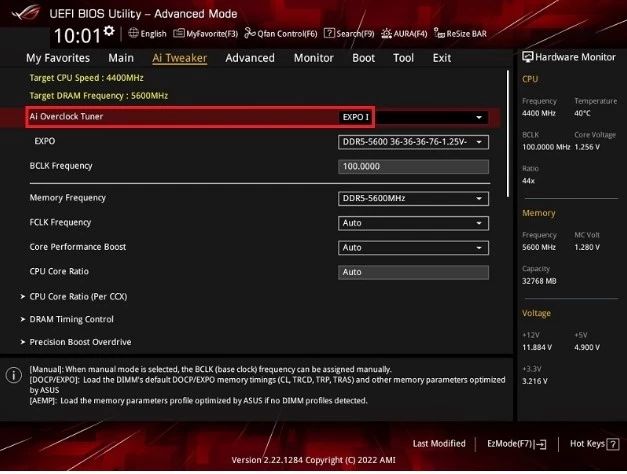
Your RAM kit is probably not running at its rated speed. A 3200 MHz DDR4 kit, by default, runs at 2133 MHz — the JEDEC standard — until you enable XMP (Intel) or EXPO (AMD) in your BIOS. That’s around a 33% speed reduction with zero reason to leave it there.
How to enable it:
- Restart your PC and enter BIOS (usually Del or F2 at startup)
- Look for “XMP” or “EXPO” in the memory or overclocking section
- Set it to “Profile 1” (which matches your kit’s advertised speed)
- Save and exit
The real-world impact varies: in CPU-bottlenecked scenarios and competitive multiplayer games, faster RAM can add 10–20% more FPS. In GPU-limited, visually heavy games, the difference is smaller but still meaningful for frame time consistency.
6. Storage Matters More Than You Think
An SSD is not optional for gaming in 2026. If your games still live on a spinning HDD, you’re experiencing the following:
- 5–10× longer loading times vs. SATA SSD
- Texture streaming hitches in open-world games
- DirectStorage incompatibility (DirectStorage requires an NVMe SSD)
The hierarchy:
- NVMe PCIe 4.0 (or 5.0): Fastest. Best choice for your game drive. PCIe 5.0 SSDs are available but only matter for DirectStorage-optimized titles.
- NVMe PCIe 3.0: Excellent for gaming, minimal real-world difference vs. Gen 4 for most games.
- SATA SSD: Fine. Still 5× faster than HDD for load times. Acceptable secondary drive.
- HDD: Not for active game installs. Fine for cold storage and backups.
TRIM and maintenance: On Windows 11, TRIM runs automatically on SSDs. You don’t need to defragment an SSD (Windows is smart enough to skip this now), but run a manual TRIM Optimize Drives occasionally on older systems.
How to Optimize Your Gaming PC for Different Gaming Scenarios
Optimizing your gaming PC depends on your target experience, whether you want smoother 144Hz gameplay, lower latency for competitive FPS, or better performance with ray tracing. The right settings can help maximize FPS, improve frame consistency, and get the most out of your hardware.
1. Optimize Your Gaming PC for 144Hz
To optimize your gaming PC for 144Hz, maintain a stable frame rate close to 144 FPS by enabling adaptive sync, capping your FPS, disabling unnecessary VSync, and using upscaling if your GPU struggles.
Enable G-Sync or FreeSync
- Enable G-Sync (NVIDIA) or FreeSync (AMD).
- Turn it on in both your GPU control panel and your monitor’s OSD.
- Reduces screen tearing and smooths variable frame rates.
Cap Your FPS
- Use RTSS (Rivatuner Statistics Server) to cap FPS at 138 FPS.
- Prevents GPU usage spikes.
- Improves frame-time consistency for smoother gameplay.
Disable VSync
- Turn VSync Off in-game when using G-Sync or FreeSync.
- Reduces input lag while adaptive sync prevents screen tearing.
Use DLSS or FSR
- Enable DLSS or FSR in Quality mode if you’re GPU-limited.
- Improves FPS while maintaining high image quality.
- Makes it easier to sustain a smooth 144Hz experience.
2. Optimize Your Gaming PC for Competitive FPS Games
Competitive gaming (think CS2, Valorant, Apex Legends) is a completely different optimization target than AAA single-player. You don’t care about ray tracing. You care about raw FPS as high as possible and input lag as low as possible.
The competitive FPS optimization stack:
- Lower resolution if needed: Use 1080p if it helps maintain higher and more stable FPS.
- Disable all post-processing: Turn off motion blur, film grain, depth of field, and ambient occlusion.
- Set your in-game FPS cap to your monitor’s max: Reduces input latency while keeping performance consistent.
- Enable NVIDIA Reflex or AMD Anti-Lag+: Lowers input latency in supported games.
- Switch to a 1000Hz USB polling rate: Provides the best balance of responsiveness and stability.
- Install your game on an NVMe SSD: Reduces texture-loading stutters and improves responsiveness.
This kind of granular tuning also connects to broader PC tweaks that go beyond the game itself—including process priority, IRQ affinity, and network stack optimization.
3. Ray Tracing PC Optimization
Ray tracing is GPU-expensive by nature. The question isn’t whether to enable it — it’s how to do so without tanking your frame rate.
The real cost of ray tracing:
- Enabling RT reflections in a demanding game like Cyberpunk 2077 or Alan Wake 2 can cut your raw FPS by 30–60%
- Path tracing (full RT) can drop a 4090 from 120 FPS to 40 FPS at 1440p without DLSS
How to get ray tracing without destroying performance:
- Use DLSS 4 or FSR 4 at Quality mode: Recover FPS with minimal loss in image quality.
- Enable only one or two RT effects: RT Shadows and RT Ambient Occlusion provide a great balance of visuals and performance.
- Target 1440p over 4K for RT: Delivers much better performance than full ray tracing at 4K.
- Enable Resizable BAR (ReBAR): Allows the CPU to access the full GPU VRAM for extra performance.
If you’re interested in pushing into 4K territory (with or without RT), check out our breakdown on how to optimize my gaming PC for 8K gaming—which covers the extreme end of visual fidelity and what hardware you actually need.
Optimize Your Gaming PC for Streaming
To optimize your gaming PC for streaming, use a hardware encoder (NVENC, AMD AV1/HEVC, or Quick Sync) instead of software x264, set your bitrate to match your actual upload speed, and cap your in-game FPS a few frames below max to leave the encoder headroom. A 6-core+ CPU and a wired connection handle the rest.
Settings for streaming optimization:
- Use NVENC, AMD AV1/HEVC, or Quick Sync instead of x264 to avoid stealing CPU from the game
- Set bitrate from your upload speed, not download — 6000–8000 Kbps for 1080p60
- Cap in-game FPS a few frames below your monitor’s max for encoder headroom
- Run 6+ CPU cores minimum, especially if using x264
- Set OBS process priority to “Normal,” not High
- Add your game and OBS to Windows Defender exclusions
- Avoid running two GPU encode sessions at once (e.g., Shadowplay + OBS)
- Use wired Ethernet — upload jitter drops more frames than low bandwidth
- Downscale resolution in OBS if your upload can’t sustain 1440p/4K
Optimize In-Game Settings of games
Even with all Windows tweaks, in-game settings matter the most. This is where most of your FPS actually comes from — not BIOS toggles, not power plans, but the sliders inside the game itself.
1. Turn Off Motion Blur
- Open your game’s video/graphics settings and disable Motion Blur.
- Adds visual noise during fast movement without improving clarity or aim.
- Nearly free FPS on every engine that includes it.
2. Turn Off VSync (Unless Screen Tearing Bothers You)
- Set VSync to Off in-game.
- Reduces input lag by not capping your frame rate to your monitor’s refresh rate.
- Leave it on only if you’re not using G-Sync/FreeSync and tearing is distracting.
3. Set Shadows to Low or Medium
- Lower Shadow Quality from Ultra/High to Low or Medium.
- One of the most GPU-expensive settings relative to its visual payoff.
- Usually the single biggest FPS gain on this list.
4. Match Texture Quality to Your VRAM
- Set Texture Quality to Medium or High depending on your GPU’s VRAM.
- 8GB+ VRAM: High textures cost almost nothing.
- 4–6GB VRAM: use Medium to avoid stutter from textures overflowing into system memory.
5. Use TAA or an Upscaler for Anti-Aliasing
- Set Anti-Aliasing to TAA, or enable DLSS/FSR/XeSS if available.
- Older methods like MSAA cost far more performance for the smoothing they provide.
- Upscaler-based AA often improves FPS instead of costing it.
Best Free Anti-Lag Software in 2026
There’s a lot of noise in this category. Here’s what’s actually worth using:
| Tool | Best For | Notes |
|---|---|---|
| NVIDIA Reflex | NVIDIA GPU users in supported games | Built into CS2, Valorant, Apex, Fortnite. Zero install, just enable in-game |
| AMD Anti-Lag+ | AMD GPU users in supported titles | Game-integrated, like Reflex. Free in Adrenalin driver |
| Rivatuner Statistics Server (RTSS) | Frametime limiter for all GPU brands | Most precise FPS cap tool available, reduces frame pacing variance |
| MSI Afterburner | GPU monitoring + OC | Free, pairs with RTSS for overlays |
| Process Lasso | CPU core parking + process priority | Paid for full features, free tier is useful for process prioritization |
Avoid “FPS booster” apps that claim to free RAM or “optimize” with one click—tools like Wise Game Booster, Game Fire, or random $5 Steam apps do nothing meaningful. Some actively hurt performance by disabling Windows features that games need.
The tools that genuinely work — Reflex, Anti-Lag+, RTSS — are all free and maintained by the GPU manufacturers or trusted developers.
Common Misconceptions About PC Gaming Optimization
These are some of the misconceptions about PC optimization that people need to understand.
“More RAM always means better gaming performance.”
Not past a certain point. 16GB is the practical floor for gaming in 2026. 32GB helps with content creation running alongside games and future-proofs you. But 64GB is overkill for pure gaming — that headroom will never be used. The bigger gain comes from running RAM at its rated speed (see XMP/EXPO above), not from adding more sticks.
“Overclocking your GPU is risky and voids your warranty.”
Modern GPU overclocking via tools like MSI Afterburner is stable, reversible, and widely practiced. NVIDIA and AMD’s warranties actually specify that “reasonable” overclocking within their software doesn’t void coverage. A +100 MHz core clock and +400 MHz memory clock on a modern GPU are a free 5–10% performance boost with negligible risk.
“Disabling your antivirus improves FPS.”
Briefly, maybe — but this is terrible advice. Windows Defender in 2026 has improved significantly, and its gaming impact is minimal with the right exclusions set. Add your game folders to the Defender exclusions list (Settings → Virus protection → Exclusions) and leave real-time protection on. Disabling AV entirely exposes you to risks that no FPS gain is worth.
“You need to reinstall Windows to fix a slow PC.”
This used to be good advice when Windows degraded over time from driver bloat. It’s less true now. Before nuking and reinstalling, try the steps in this guide. A clean driver installation, power plan change, and BIOS XMP enable can make a system feel brand new without losing your files.
Settings That I Would Apply If I Were in Your Place?
If I were optimizing my PC right now, I wouldn’t change every Windows setting I could find. I’d start with the few settings that can have the biggest practical impact on FPS, frame consistency, and input latency.
- Enable XMP/EXPO: This is the first BIOS setting I’d check so the RAM actually runs at its advertised speed.
- Turn on Game Mode: I’d enable Settings → Gaming → Game Mode to reduce unnecessary background activity while gaming.
- Set Windows to High Performance: On a desktop, I’d switch to High Performance so the CPU isn’t aggressively lowering its clocks during gaming.
- Update GPU drivers: I’d install the latest Game Ready driver for NVIDIA or the latest AMD Adrenalin driver, using a clean installation when appropriate.
- Enable Maximum Performance in the GPU control panel: I’d use the maximum-performance power setting when the goal is consistent gaming performance.
- Use G-Sync or FreeSync: If I have a compatible monitor, I’d enable adaptive sync to reduce tearing and improve frame consistency.
- Use an FPS cap: For a 144Hz display, I’d cap the game around 138 FPS when using adaptive sync to keep frame times more consistent.
I wouldn’t bother changing everything at once. I’d apply these first, test the games I actually play, and only move on to deeper tweaks if I’m still seeing stutters or inconsistent performance.
Questions Commonly Asked About PC Optimization
Sudden slowdowns are usually caused by background updates, driver conflicts, or startup apps. Check Task Manager for high CPU or Disk usage and close unnecessary processes.
Enable G-Sync or FreeSync, cap FPS around 138, lower demanding settings, and make sure Windows is set to output at a 144Hz refresh rate.
Yes, reinstalling can fix corrupted files or shader issues. First, try verifying game files through your launcher before reinstalling.
An FPS cap limits frame rate with lower input lag, while VSync removes screen tearing but can add latency. For competitive gaming, an FPS cap is usually the better choice.
Final Words on How To Optimize My PC For Gaming
Optimizing your PC for gaming isn’t about one magic tweak—it’s a stack of small changes that compound. Update your GPU drivers properly, enable XMP/EXPO for full RAM speed, switch to the High Performance power plan, turn on the right in-game settings for your use case, and use free tools like RTSS and NVIDIA Reflex.
If you’re pushing into specialized territory — VR, 4K, 8K, cloud gaming, or a gaming laptop setup — the optimization path diverges. Start with the fundamentals in this guide, then go deeper:
- VR gaming: How to set up your gaming PC for VR and how to optimize your gaming laptop for VR gaming
- Cloud gaming on a laptop: How to optimize your gaming laptop for cloud gaming
The fundamentals covered here will get most setups 80% of the way there. The specialized guides will take you the rest of the way.
